The Four-Variable Karnaugh Map
In the previous article we practised on small maps. In this one we move to the 4-variable map, which is the one you will actually use. Sixteen cells in a 4×4 grid handle most of the gate-level problems you will meet by hand, and the map introduces one adjacency that surprises everyone the first time: the four corners form a group.
The layout
$A$ and $B$ label the rows, $C$ and $D$ label the columns, and both axes are in Gray code order (Figure 1).
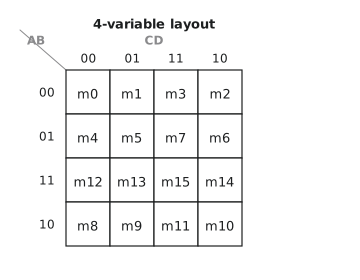
Look at the layout carefully before you use it. Row AB = 11 is the third row, not the fourth, and row AB = 10 is the fourth. The same applies to the columns: CD = 11 is the third column. Cells that touch are adjacent, and so are cells at opposite edges of the same row or column.
| Minterm | A | B | C | D | Minterm | A | B | C | D | |
|---|---|---|---|---|---|---|---|---|---|---|
| 0 | 0 | 0 | 0 | 0 | 8 | 1 | 0 | 0 | 0 | |
| 1 | 0 | 0 | 0 | 1 | 9 | 1 | 0 | 0 | 1 | |
| 2 | 0 | 0 | 1 | 0 | 10 | 1 | 0 | 1 | 0 | |
| 3 | 0 | 0 | 1 | 1 | 11 | 1 | 0 | 1 | 1 | |
| 4 | 0 | 1 | 0 | 0 | 12 | 1 | 1 | 0 | 0 | |
| 5 | 0 | 1 | 0 | 1 | 13 | 1 | 1 | 0 | 1 | |
| 6 | 0 | 1 | 1 | 0 | 14 | 1 | 1 | 1 | 0 | |
| 7 | 0 | 1 | 1 | 1 | 15 | 1 | 1 | 1 | 1 |
Group sizes now go up to 16:
| Group size | Variables eliminated | Literals in term |
|---|---|---|
| 1 | 0 | 4 |
| 2 | 1 | 3 |
| 4 | 2 | 2 |
| 8 | 3 | 1 |
| 16 | 4 | none, F = 1 |
A group of eight gives a single-literal term, so a function of four variables can collapse to something like $F = C$.
The corner group
Look at the four corner cells: $m_0$ (top left), $m_2$ (top right), $m_8$ (bottom left) and $m_{10}$ (bottom right). Check the adjacencies. $m_0$ and $m_2$ are in the same row, in columns CD = 00 and CD = 10, which differ only in C. $m_0$ and $m_8$ are in the same column, in rows AB = 00 and AB = 10, which differ only in A. The same holds for the other two pairs. All four corners are mutually adjacent through the wrap-around, and on the torus they are a 2×2 square.
| Cell | A | B | C | D |
|---|---|---|---|---|
| 0 | 0 | 0 | 0 | 0 |
| 2 | 0 | 0 | 1 | 0 |
| 8 | 1 | 0 | 0 | 0 |
| 10 | 1 | 0 | 1 | 0 |
$A$ and $C$ vary. $B = 0$ and $D = 0$ throughout. The corner group reads $B’D’$. Figure 2 shows it drawn.
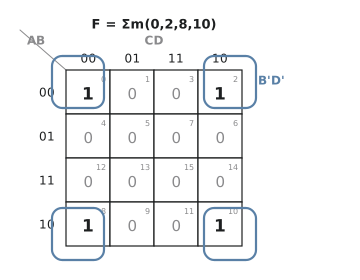
Without recognising the corner group, you would cover these four cells with four separate groups of two and get four 3-literal terms instead of one 2-literal term. Whenever you see 1s in the corners, check whether they form this group.
The full procedure
For any 4-variable map:
- Put a 1 in the cell of every minterm in the function. The other cells are 0.
- Find all the prime implicants, working from large to small: a group of 16, then groups of 8, then 4 (including wrap-around and corner groups), then 2, then any isolated 1.
- Draw each prime implicant and write its term.
- Build the prime implicant chart: one row per prime implicant, one column per minterm, with a mark where the implicant covers the minterm.
- Any column with a single mark identifies an essential prime implicant. Every essential one goes into the solution.
- Remove the minterms the essential implicants cover.
- If minterms remain, choose the fewest additional prime implicants that cover them.
- OR the terms of the chosen implicants.
Worked example 1: $F = \sum m(0, \ldots, 7)$
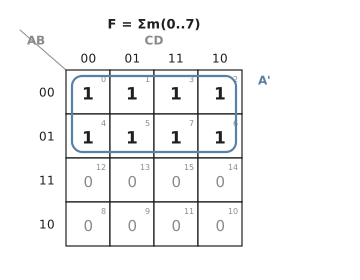
The top two rows, AB = 00 and AB = 01, are all 1s. That is a group of eight. $A = 0$ in both rows and $B$, $C$, $D$ all vary, so $F = A’$. Minterms 0 to 7 are exactly the ones with $A = 0$.
Worked example 2: $F = \sum m(1, 3, 5, 7, 9, 11, 13, 15)$
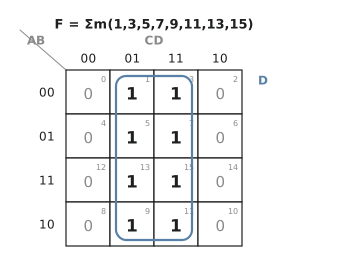
The columns CD = 01 and CD = 11 are all 1s: a group of eight. CD = 01 has C = 0, D = 1 and CD = 11 has C = 1, D = 1, so the constant is $D = 1$ and $F = D$. All the odd minterms have $D = 1$.
Product of sums from the zeros
Everything so far has grouped the 1s to give a sum of products. Grouping the 0s instead gives a product of sums directly. The grouping rules are identical. The reading is complemented: for each group of 0s, write a sum term containing each constant variable in complemented form, so a variable that is constant at 1 appears as its complement and a variable constant at 0 appears plain.
Take $F = \sum m(0, 2, 8, 10)$ again and group its zeros (Figure 5).
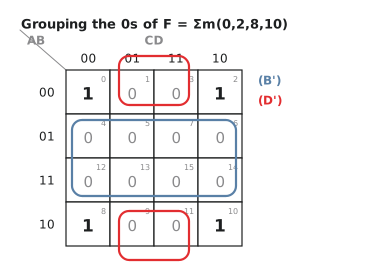
The middle two rows, AB = 01 and AB = 11, are all 0s: a group of eight with $B = 1$ constant. The sum term is $(B’)$. The remaining zeros, cells 1, 3, 9 and 11, are the middle columns of the top and bottom rows, a wrap-around group of four with $D = 1$ constant. The sum term is $(D’)$. So $F = (B’)(D’) = B’D’$, the same answer as before. For a function this small the two forms coincide. For larger functions one is often much smaller than the other, and it is worth looking at both. When the 0s form a few large clean groups, the POS form wins.
More than one minimal answer
Some maps have more than one equally small solution. Take $F = \sum m(0, 1, 3, 5, 6, 7, 8, 9, 11, 13, 14, 15)$, shown in Figure 6.
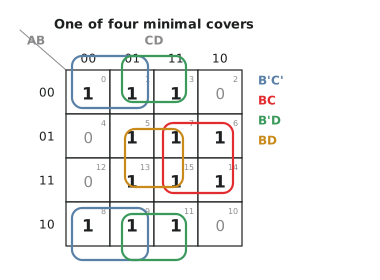
There are six prime implicants of size four: $B’C’$, $BC$, $B’D$, $BD$, $C’D$ and $CD$. Two are essential ($B’C’$ for cell 8 and $BC$ for cells 6 and 14). Their complements cover cells 0, 1, 8, 9, 6, 7, 14 and 15, which leaves 3, 5, 11 and 13. Those four can be covered by $B’D + BD$, or by $C’D + CD$, or by two other pairs. Every choice gives four terms of two literals. All of them are correct and equally good. A synthesis tool will pick one; by hand you may pick any.
This is one reason synthesis tools use heuristics rather than exhaustive search: for large functions the number of equally minimal solutions can be enormous, and finding one is enough.
Practice Exercise
Problem 1. Minimise $F = \sum m(0, 1, 4, 5, 10, 11, 14, 15)$.
Solution
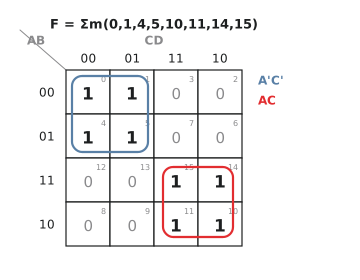
The top-left 2×2 block, cells 0, 1, 4 and 5, covers rows AB = 00 and 01 (A = 0 in both) and columns CD = 00 and 01 (C = 0 in both). It reads $A’C’$. The bottom-right block, cells 10, 11, 14 and 15, covers rows AB = 11 and 10 (A = 1) and columns CD = 11 and 10 (C = 1). It reads $AC$. Both are essential. $F = A’C’ + AC$, which is the XNOR of A and C.
Problem 2. Minimise $F = \sum m(3, 7, 11, 12, 13, 14, 15)$.
Solution
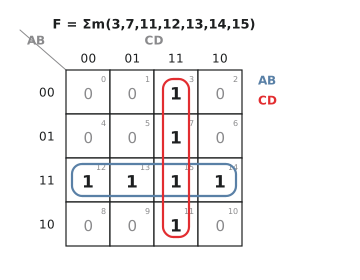
The full row AB = 11 gives $AB$. The full column CD = 11 gives $CD$. Cell 15 is in both. Cells 3, 7 and 11 are covered only by the column, and 12, 13 and 14 only by the row, so both are essential. $F = AB + CD$.
In the next article we add don’t-care conditions to the map. They are free simplification, and they also carry a risk that is worth understanding.