Two- and Three-Variable Karnaugh Maps
In the last article we saw why a Karnaugh map works. In this one we start using it. Karnaugh maps are one of those skills that seem confusing when described and obvious after a few examples, so this article is mostly examples. We begin with 2-variable maps, where you can check everything algebraically in seconds, and move to 3-variable maps, where the method starts to pay off. Every rule here carries over unchanged to the 4-variable maps in the next article.
The 2-variable map
A function of $A$ and $B$ has four minterms, laid out in a 2×2 grid with $A$ on the rows and $B$ on the columns (Figure 1).
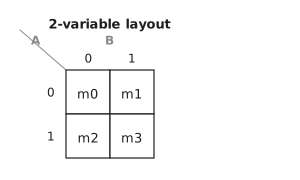
With only two labels per axis there is no Gray code to worry about, but label the axes anyway. The habit will save you from mistakes on bigger maps.
Take $F = \sum m(1, 2, 3)$, shown in Figure 2.
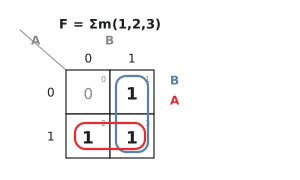
The right column, cells 1 and 3, has $B = 1$ throughout and gives the term $B$. The bottom row, cells 2 and 3, has $A = 1$ throughout and gives $A$. Cell 3 is used twice, which is allowed and is the right thing to do, since it lets each group be a full pair. So $F = A + B$.
Algebraically, $A’B + AB’ + AB = A’B + A(B’ + B) = A’B + A = A + B$, using the absorption variant. The map did it in one step.
The 3-variable map
A function of $A$, $B$ and $C$ has eight minterms in a 2×4 grid, with $A$ on the rows and $BC$ on the columns in Gray code order (Figure 3).
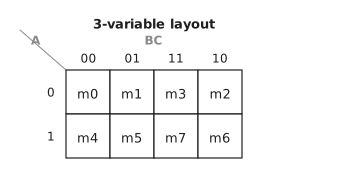
The thing that catches people the first time is that $m_3$ (A = 0, B = 1, C = 1) is in the third column, not the fourth, because the columns are in Gray code. That order is what makes each column adjacent to the next: 00 and 01 differ in C, 01 and 11 differ in B, 11 and 10 differ in C, and 10 wraps round to 00 differing in B. So the leftmost and rightmost columns are adjacent and a group can span the two.
In a 3-variable map, a group of two eliminates one variable and gives a 2-literal term, a group of four eliminates two and gives a single literal, and a group of eight means the function is the constant 1.
The grouping rules
Every grouping mistake comes from breaking one of these:
- Group only 1-cells. (Grouping 0-cells gives the product-of-sums form; we do that in the next article.)
- Groups are rectangles. No L-shapes, no diagonals.
- Group sizes are powers of two: 1, 2, 4, 8, 16. Never 3 or 6.
- Cells may belong to more than one group. Reusing a cell to make a bigger group is good practice, not cheating.
- Groups may wrap across the left-right edge and the top-bottom edge.
- Bigger is better. One group of four beats two groups of two covering the same cells.
The most common error is stopping too early, satisfied with a group of two when a group of four was available. Before you finish, ask of every group whether it can be doubled.
Prime implicants
Two definitions are needed before the examples.
A prime implicant is a group of 1s that cannot be enlarged without including a 0. It is a maximal group.
An essential prime implicant is a prime implicant that covers at least one 1 that no other prime implicant covers. Since nothing else covers that cell, this group has to be in the solution.
The procedure is then: find all the prime implicants, take every essential one, check whether all the 1s are now covered, and if not, add the fewest further prime implicants needed to cover the rest.
Worked example 1: $F = \sum m(0, 1, 2, 3)$
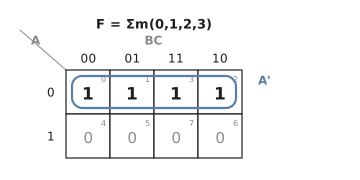
The entire top row is 1. That is one group of four. $A = 0$ throughout while $B$ and $C$ take every combination, so the group reads $A’$. It is the only prime implicant and it is essential. $F = A’$, which makes sense: minterms 0 to 3 are exactly the ones with $A = 0$.
Worked example 2: $F = \sum m(1, 3, 5, 7)$
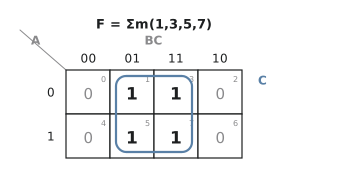
The 1s fill the columns BC = 01 and BC = 11, both rows. That is a group of four. Now read the labels carefully. BC = 01 means B = 0, C = 1; BC = 11 means B = 1, C = 1. What the two columns share is C = 1, not B = 1. $A$ and $B$ vary, so the term is $C$, and $F = C$.
I mention the labels because reading “the two middle columns” as “B = 1” is the single most common mistake on 3-variable maps. Always read what is constant from the labels, not from the position.
Check: $m_1 = A’B’C$, $m_3 = A’BC$, $m_5 = AB’C$, $m_7 = ABC$, all with $C = 1$.
Worked example 3: $F = \sum m(0, 2, 4, 5, 6, 7)$
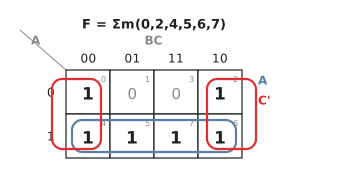
Now there are several groups to find. Work from largest to smallest.
A group of eight would need every cell to be 1, and cells 1 and 3 are 0, so no.
Groups of four: the whole bottom row, cells 4, 5, 6 and 7, is 1. $A = 1$ throughout, so this group reads $A$. And the first and last columns, BC = 00 and BC = 10, are all 1s: cells 0, 2, 4 and 6. These columns are adjacent through the wrap-around. BC = 00 has C = 0 and BC = 10 has C = 0, so the constant is $C = 0$ and the group reads $C’$.
| Prime implicant | Cells | Term |
|---|---|---|
| P1 | 4, 5, 6, 7 | $A$ |
| P2 | 0, 2, 4, 6 | $C'$ |
Cell 0 is covered only by P2, so P2 is essential. Cell 5 is covered only by P1, so P1 is essential. Between them they cover all six 1s, so $F = A + C’$.
Check: $F$ is 0 only for cells 1 and 3, which are the cells with $A = 0$ and $C = 1$. Correct.
The group of cells 0, 2, 4 and 6 is a wrap-around group. On the flat drawing the cells are at opposite edges, but the column labels BC = 10 and BC = 00 differ in one bit only, so they are adjacent. When you draw such a group by hand, draw it as two half-boxes that run off the edges, the way the figure does. The drawing reminds you that you used an adjacency that is not visible on the page.
Practice Exercise
Problem 1. Minimise $F = \sum m(0, 3, 4, 7)$.
Solution
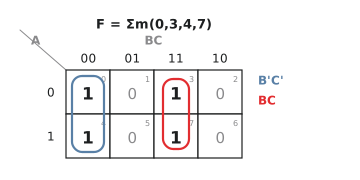
The 1s are in columns BC = 00 and BC = 11. Those columns are two steps apart and differ in both B and C, so they are not adjacent and the four cells do not form a group of four. What we have is two groups of two. Cells 0 and 4, column BC = 00, give $B’C’$. Cells 3 and 7, column BC = 11, give $BC$. Both are essential. $F = B’C’ + BC$, which is the XNOR of B and C.
Problem 2. Minimise $F = \sum m(2, 3, 6, 7)$.
Solution
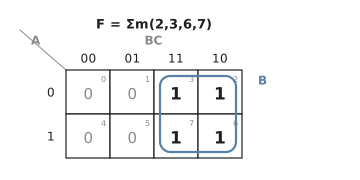
The 1s fill columns BC = 11 and BC = 10 in both rows: one group of four. BC = 11 has B = 1, C = 1 and BC = 10 has B = 1, C = 0, so the constant is $B = 1$. $F = B$.
In the next article we move to the 4-variable map, which is the one you will use most, and meet the corner group.