A Procedure for Hazard-Free Design
Hazard removal can look like an art: stare at the circuit, spot a glitch, add a gate, hope. It is not. For a two-level circuit there is a short procedure that finds every static hazard and removes it, with nothing left to intuition. It takes a few minutes and it is what you use for any signal that is sampled without a clock edge: asynchronous controls, handshakes, memory enables.
The four steps
1. List the candidates. A static hazard can only occur on a single-variable transition between two input combinations where the output is meant to stay the same. On the map, that is every pair of adjacent 1-cells (for static-1 hazards) or adjacent 0-cells (for static-0). Draw the map and mark every adjacent pair of 1s. Each cell in a 3-variable map has three neighbours, in a 4-variable map four.
2. Check coverage. For each pair, ask whether one term of your expression covers both cells. If yes, that transition is safe. If no, it is a hazard.
3. Add bridging terms. For each hazard, add the smallest implicant that covers both cells of the pair. It is redundant algebraically and necessary physically.
4. Verify. Go through every pair from step 1 again. Adding a term can never create a new static-1 hazard, since it only adds coverage, so once every pair is covered you are done.
Transitions that change two variables at once are outside this model. In practice the two inputs never change at exactly the same time, so the circuit sees them one after the other, and the single-variable analysis applies to each step.
A worked example
$F(A, B, C) = \sum m(0, 2, 4, 6, 7)$. Figure 1 shows the map.
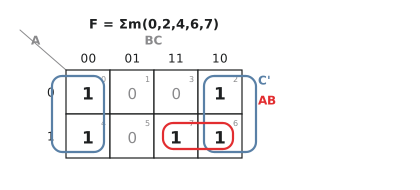
The minimal cover is $C’$ (cells 0, 2, 4, 6) and $AB$ (cells 6, 7): $F = C’ + AB$.
Adjacent 1-pairs and their coverage:
| Pair | Differ in | Common term |
|---|---|---|
| 0, 2 | B | $C'$ |
| 0, 4 | A | $C'$ |
| 2, 6 | A | $C'$ |
| 4, 6 | B | $C'$ |
| 6, 7 | C | $AB$ |
Every pair shares a term. $F = C’ + AB$ is already hazard-free, and the check, not a feeling, is what tells you so. Minimal covers sometimes are hazard-free; you only know by enumerating.
The POS version
For a product-of-sums circuit, do the same with the 0-cells and the sum terms. Take $F = (A + C’)(B’ + C)$. The term $(B’ + C)$ is 0 when $B = 1$ and $C = 0$, cells 2 and 6. The term $(A + C’)$ is 0 when $A = 0$ and $C = 1$, cells 1 and 3. So the 0-cells are 1, 2, 3 and 6.
Cells 2 and 3 are adjacent (they differ in $C$) and are covered by different sum terms, so there is a static-0 hazard when $A = 0$, $B = 1$ and $C$ changes. Both cells have $A = 0$ and $B = 1$; the sum term that is 0 exactly there is $(A + B’)$. Add it:
$$F = (A + C’)(B’ + C)(A + B’)$$
Don’t-cares
Don’t-cares interact with hazards in two directions. A don’t-care treated as 1 can let a single larger group span two cells that were in separate groups, which removes a hazard for free. But a don’t-care treated as 1 is also a new 1-cell, adjacent to others, and can create a new uncovered pair. The rule is to assign the don’t-cares first, then run the four steps on the map that results.
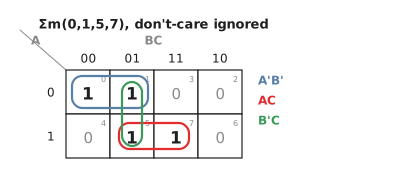
Take $F = \sum m(0, 1, 5, 7)$ with a don’t-care at cell 3. Ignoring the don’t-care, the minimal cover is $A’B’ + AC$ (Figure 2). Cells 1 and 5 differ in $A$ and are in different groups: a hazard, fixed by adding $B’C$.
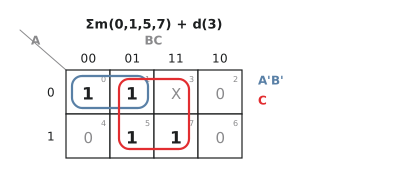
Now treat cell 3 as 1. Cells 1, 3, 5 and 7 are the whole $C = 1$ column and form one group, $C$. The cover becomes $A’B’ + C$ (Figure 3). Check the pairs: 0 and 1 share $A’B’$; 1 and 3, 1 and 5, 3 and 7, 5 and 7 all share $C$. No hazards, and the expression is smaller than either version without the don’t-care.
When not to bother
Hazard removal adds gates, so first decide whether it is needed.
Skip it when the output drives the D input of a flip-flop in a synchronous design and static timing analysis passes; when the system guarantees a settling delay before the output is read; when the hazardous transition cannot occur because something upstream prevents that input pattern; or when you are on an FPGA with a fully synchronous design, where the timing tools give a stronger guarantee than hand analysis.
Do it when the output goes to a pin; to an asynchronous set or reset; to a clock enable that is not a proper clock-gating cell; to a write enable, chip select or output enable; to a handshake crossing into another clock domain; or to a latch. The empty and full flags of an asynchronous FIFO are a classic case: they come from combinational comparisons of pointers, a glitch on them corrupts the fill level, and the failure is intermittent and almost impossible to reproduce in simulation.
Cost
Each hazard costs one extra AND term, and in the NAND-NAND form that real libraries use, that is one more NAND at the first level and one more input on the output NAND. For the functions in this course it is one to three extra gates. It is cheap insurance where it is needed.
Practice Exercise
$F(A, B, C) = \sum m(0, 1, 5, 7)$ with a don’t-care at cell 3. Find the minimal cover without the don’t-care, its hazards, and the hazard-free form; then do it with the don’t-care and compare.
Solution
Without the don’t-care: the prime implicants are $A’B’$ (0, 1), $B’C$ (1, 5) and $AC$ (5, 7); $A’B’$ and $AC$ are essential and cover everything, so the minimal cover is $A’B’ + AC$. Pairs: 0 and 1 share $A’B’$, 5 and 7 share $AC$, but 1 and 5 do not share a term. Add $B’C$: $F = A’B’ + AC + B’C$, three ANDs and an OR.
With cell 3 as 1: the group $C$ covers 1, 3, 5 and 7, and $A’B’$ covers 0 and 1. $F = A’B’ + C$. Every adjacent pair shares a term. One AND and one OR, and no bridge needed. The don’t-care both simplified the function and removed the hazard.
The last article of the module looks at four ways hazards have caused real failures, states the synchronous design principle properly, and reviews everything built in Module 2.