Fixing a Real Routing Failure
This closes Module 6 with a complete failure-and-fix cycle on the UART. Break something on purpose, pushing placement density higher than it should be in exactly the way that creates the local pocket from the previous article, watch routing fail with a real violation report, diagnose it with the method rather than guessing, fix the actual cause, and confirm a clean result. This is the workflow every physical designer uses, not a capstone-only ritual. You will use the same loop for the rest of the course.
Break it on purpose
From the UART’s placed-and-clocked state, bump the density aggressively and rerun placement and CTS before routing:
{
    "DESIGN_NAME": "uart",
    "PL_TARGET_DENSITY": 0.85,
    "CLOCK_PORT": "clk",
    "CLOCK_PERIOD": "20.0",
    "RT_MIN_LAYER": "met1",
    "RT_MAX_LAYER": "met4"
}
A target of 0.85 against the design’s comfortable 0.50 packs cells far more tightly than the core’s routing capacity was sized for, and the parity logic the placer already pulls together is the region most at risk.
% prep -design uart -tag routing_run_overdense
% run_placement
% run_cts
% run_routing
Watch it fail
The routing summary from the over-dense run:
====== Global Routing Summary ======
Nets with overflow: 6
Peak overflow (any edge): 4

====== Detailed Routing Summary ======
Initial violations (iteration 0): 340
Final violations: 22
Rip-up/reroute iterations used: 64 (of 64 available)
Unrouted nets: 4
Routing DRC violations: 22
Run status: ROUTING COMPLETE - VIOLATIONS PRESENT
This is the non-convergent pattern from the running-routing article: budget exhausted, violations still present, and global routing already showing overflow before detailed routing started. The violation report clusters the same way the previous two articles described:
[VIOLATION 1] Type: Short          Layer: met2   Location: (118400,176200)-(118900,176200)
[VIOLATION 2] Type: MinSpacing     Layer: met3   Location: (140100,182000)
[VIOLATION 3] Type: Unrouted       Net: parity_check   Reason: No legal path within congestion bounds
...
[VIOLATION 14] Type: MinSpacing    Layer: met2   Location: (121800,179400)
Diagnose, do not guess
Per the previous article, check where the trouble concentrates before touching any config. A congestion heatmap for this run shows a sharp hotspot in exactly the x = 118000 to 142000, y = 176000 to 182000 region the violations cluster around, the parity logic’s neighbourhood, while the rest of the core reads green to yellow. That is the local-density pattern, not the whole-core pattern that would point at the floorplan. The diagnosis: a placement problem, specifically local over-density in one region. Not routing, not floorplan.
Fix the actual root cause
The fix is in Module 4’s territory, not routing config. Bring density back to a value that leaves real routing headroom, and since one cluster in particular over-packed, add a small amount of cell padding so the placer does not pull it quite so tight even at the design’s overall density:
{
    "PL_TARGET_DENSITY": 0.52,
    "CELL_PAD": 2
}
CELL_PAD adds a little horizontal spacing around every cell during placement, a cheap way to guarantee routing headroom everywhere without changing the floorplan, useful when one cluster tends to pack tighter than the rest.
Rerun and verify clean
% prep -design uart -tag routing_run_fixed
% run_placement
% run_cts
% run_routing
====== Global Routing Summary ======
Nets with overflow: 0
Peak overflow (any edge): 0

====== Detailed Routing Summary ======
Initial violations (iteration 0): 61
Final violations: 0
Rip-up/reroute iterations used: 4 (of 64 available)
Unrouted nets: 0
Routing DRC violations: 0
Run status: ROUTING COMPLETE - CLEAN
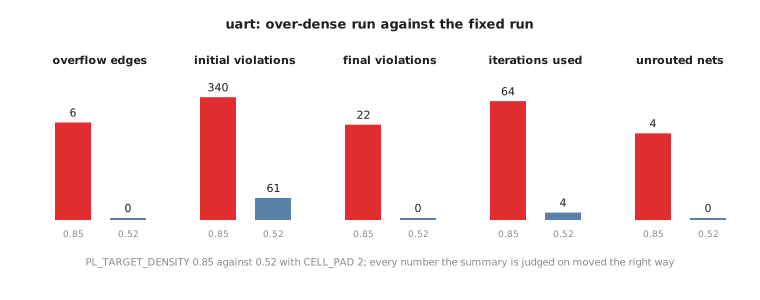
Zero overflow, zero final violations, zero unrouted nets, and convergence in 4 iterations instead of exhausting 64. Every number in the “how do you know it is really done” checklist reads clean. Note that the initial violation count, 61, is far below the over-dense run’s 340 before any rip-up happened at all. That is direct evidence the fix addressed the cause upstream rather than giving the router more chances to paper over the same shortage.
This loop, run, fail, check where violations cluster, decide placement against floorplan against routing config, adjust one thing, rerun, is what iterating to closure means in real physical design. It is rarely one clean run for anything beyond a trivial design. The skill is not avoiding failures. It is diagnosing them fast and fixing the right layer of the flow instead of thrashing on the wrong one. The tempting shortcut, cranking DRT_OPT_ITERS or setting GRT_ALLOW_CONGESTION to true so the run “completes”, fixes nothing. It tells the tools to tolerate the same shortage and report success anyway, and drags the problem forward into Modules 7 and 8 as a timing or IR drop issue instead of a clean routing failure you could have fixed while it was cheap.
Practice Exercise
Suppose lowering PL_TARGET_DENSITY to 0.52 alone, without CELL_PAD, had left 2 unrouted nets, both still in the parity cluster’s neighbourhood. What would that partial result tell you, and what is a reasonable next adjustment?
Solution
The overall density reduction helped globally, but that specific cluster still packs tighter than the design’s average, so it needs a local correction on top of the global one, not instead of it. That is exactly what CELL_PAD, or explicitly relaxing placement for that region, is for: a targeted fix for one persistently tight cluster once the broad fix has done its part. The diagnostic principle still applies. Check that the remaining 2 violations cluster together, which they do here, before deciding the fix is local rather than a further global density cut that would spread cells out everywhere to fix a problem confined to one small area.
The UART has gone from a placed, clocked netlist with not one real wire to a fully routed, design-rule-correct layout. A routed design is not a signed-off design, though. Module 7 takes the UART’s real routed wires, with real parasitic resistance and capacitance rather than the estimates every stage until now has used, and puts them through the timing analysis that decides whether this chip works at 50 MHz.