Reading a Congestion Heatmap
Section 4.4 is about a resource placement never looks at. Every routing track on every metal layer is finite. A horizontal strip of met2 only has room for so many parallel wires before you run out of space at the required spacing. Placement does not know or care about that limit. It optimises wirelength and cell density. So there is a real, structural gap between “placement thinks this region is fine” and “there is enough routing capacity here to wire it up”. A congestion map closes that gap, and it is available the moment placement finishes, well before Module 6’s routing stage.
Demand against capacity, per region
The core is divided into a grid of small rectangles called GCells, global routing cells, a coarser grid laid over the standard cell rows purely for routing bookkeeping. For every GCell edge on every metal layer the tool computes two numbers. Capacity is how many routing tracks physically cross that edge on that layer, given the layer’s pitch and the GCell’s size. Demand is how many tracks the nets that need to cross that edge are estimated to need, from the current placement and a coarse, unrouted estimate of how each net would cross the grid.
$$\text{Utilisation} = \frac{\text{Demand}}{\text{Capacity}} \times 100%$$
A congestion heatmap is that utilisation for every GCell edge across the core, colour coded so patterns jump out instead of having to scan thousands of numbers.
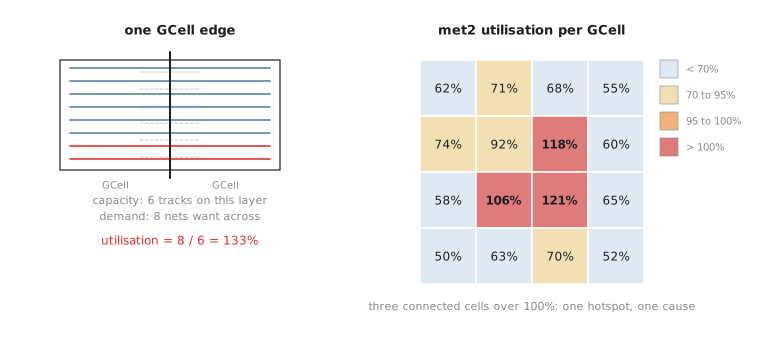
Reading a heatmap is reading that scale against a spatial picture. A region that is uniformly cool, well under 100%, has comfortable headroom. A region with a hard, isolated red patch, one GCell edge or a small cluster well over 100% surrounded by otherwise fine neighbours, is a hotspot: a local pinch point where too many nets are trying to cross too little capacity, usually because a cluster of high-fanout logic, a wide mux, a decoder or a bus, landed in one small region.
Finding the hotspots
Here is a simplified 4x4 grid of GCell utilisation for met2 across a small part of alu8’s core after placement:
| Col1 | Col2 | Col3 | Col4 | |
|---|---|---|---|---|
| Row1 | 62% | 71% | 68% | 55% |
| Row2 | 74% | 92% | 118% | 60% |
| Row3 | 58% | 106% | 121% | 65% |
| Row4 | 50% | 63% | 70% | 52% |
Find every cell over 100% before reading on: Row2/Col3 at 118%, Row3/Col2 at 106% and Row3/Col3 at 121%.
Those three form a small, connected cluster in the middle of the grid rather than being scattered. That pattern matters. A connected hotspot usually traces to one cause, a group of cells placed too tightly together feeding or fed by a common high-fanout net, and it is worth investigating by name rather than treating as generic noise across the design.
A single isolated GCell at, say, 102% is rarely a problem on its own. Routers have some freedom to detour around a small pinch using neighbouring tracks or an adjacent layer. A cluster of connected overloaded GCells like the three above is a much stronger signal, because there is less room to route around the whole cluster rather than through it.
Congestion is also a moving target. It changes every time you adjust PL_TARGET_DENSITY (Section 4.5), every time synthesis strategy changes upstream, and again once CTS adds buffer cells. Treat a congestion check the way you treat a timing check: something you rerun after any change that could plausibly move cells, not a one-time gate.
Practice Exercise
A different 3x3 region reports these met3 utilisations:
| Col1 | Col2 | Col3 | |
|---|---|---|---|
| Row1 | 80% | 84% | 79% |
| Row2 | 88% | 96% | 90% |
| Row3 | 82% | 87% | 85% |
Is this region congested in the sense that requires action? Explain using the scale from this article.
Solution
No GCell exceeds 100%, so there is no overflow by the strict definition. Nothing here represents demand that literally cannot fit. That said, the whole region sits between 79% and 96%, uniformly busy with little slack anywhere, and the centre cell at 96% is close enough to the ceiling to keep an eye on if any upstream change, a density increase or a CTS buffer, is still coming. This is the tight-but-not-broken zone: not an emergency, but not somewhere you would add more local logic without rechecking.
Overflow above 100% is the headline number, but it is worth understanding exactly why it matters downstream. A placement can have zero legalisation overlaps and still be fundamentally unroutable. That is the next article.