Module 6: Verilog for Testbench & Simulation
In 1994 Intel shipped a processor that sometimes divided wrongly. The error was in a lookup table used by the floating-point divider, a handful of entries that should have held values and held zeros, and it was found not by Intel but by a mathematician whose number-theory results kept coming out slightly off. The chip had passed every test Intel ran; none of those tests happened to hit the bad entries. The recall cost Intel several hundred million dollars. The lesson has been taught on the first day of every verification course since: a design with an incomplete test suite is a design nobody can trust, including you.
Simulating with your eyes
By now you have been simulating: write a module, write a quick testbench, run Icarus, open GTKWave, stare at the waves until they look right, move on. That works for ten signals and five cases. It fails at fifty signals and a hundred input combinations, and it collapses at an SPI controller with eight combinations of polarity, phase and bit order, each with its own corner cases. Nobody can squint at that many waveforms, and the moment attention drifts, bugs go through.
Worse, it cannot be automated, put in a build pipeline, or handed to a colleague. The cure is not more simulation. It is testbenches that check themselves.
Where the effort goes
In professional hardware work, verification, testbenches, simulation, coverage, chasing bugs, takes more than half of the project and often two-thirds. Not because hardware people are cautious, but because hardware has no safety net. A software bug that reaches a user produces an error message and a patch. A hardware bug that reaches silicon produces a re-spin, months and a great deal of money; on an FPGA it is a new bitfile, but a bug in a shipped product is still a crisis. A bug found in simulation costs minutes. Found on a prototype board, weeks. Found by a customer, months and trust. That asymmetry is why it is always worth spending more time on simulation.
Two kinds of Verilog
From this module on you write two things that look alike. RTL describes hardware; every construct becomes gates, flip-flops or wires, and it has to be synthesisable. Testbench Verilog describes a test environment; it runs only in simulation, never becomes silicon, and can use $display, $finish, file access, arbitrary delays and loops of millions of iterations, because the simulator runs it as a program. Design files go to synthesis; testbench files are compiled with them for simulation and nowhere else. Never mix them in one file.
The boundary
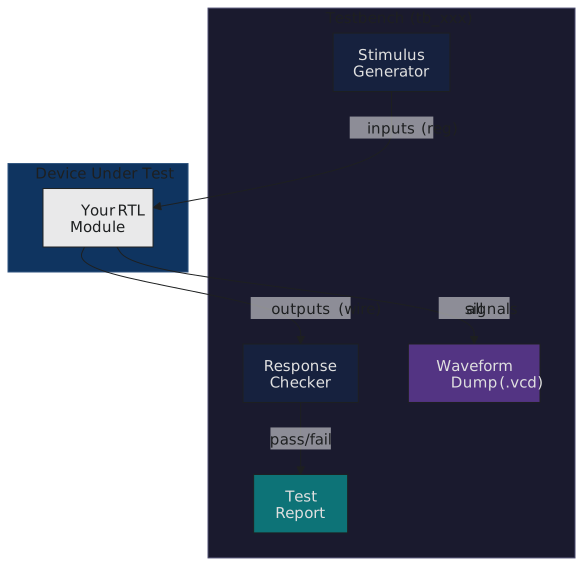
Every testbench in this module has the same shape (Figure 1). The testbench is the top of the simulation, with no ports, since nothing sits above it. It instantiates the design under test, drives its inputs, reads its outputs, and either prints what it sees or checks it. The design knows nothing about the testbench; it has inputs and outputs, as it will in hardware.
The sections

| Section | Topic |
|---|---|
| 6.1 | Testbench architecture: why, the four parts, driving, sampling, the self-checking loop |
| 6.2 | Simulation-only constructs: display, monitor and strobe; finish, time and watchdogs; files; readmemh; delays, events and wait |
| 6.3 | Clocks and resets: generating clocks, reset protocols, initialisation, two clock domains |
| 6.4 | Self-checking tests: the mindset, immediate assertions, reference models, comparison, directed vectors |
| 6.5 | Waveforms: VCD files, GTKWave, reading waveforms, from a waveform to a fix |
You should arrive with Module 5 done, comfortable with always blocks, both assignments, flip-flops and state machines, and with Icarus Verilog and GTKWave installed. If you wrote the Module 5 designs without testbenches, this is the module to go back and give them some.
Section 6.1 opens with the question that should bother every designer: synthesis passed, the bitfile loaded, the board does nothing, where do you look? Start at 6.1.