Project 3, Part 2: Macro-Aware Placement and Routing
In the previous article we fixed the SRAM macro in place. In Projects 1 and 2 placement had one job: minimise wirelength across an open field of rows. Here the placer has a large, immovable obstacle in the middle of the field, and every net that talks to it must reach one edge of it. In this article we see what that does to placement and, more so, to routing.
Placement with a fixed obstacle
openlane --flow Classic --run-tag sram_run1 --from OpenROAD.GlobalPlacement --to OpenROAD.DetailedPlacement \
         designs/sram_ctrl/config.json
[INFO DPL-0001] Placed 152 instances
Max displacement: 2.6 um
Only about 150 standard cells, yet the largest displacement is almost twice Project 2’s. That is not noise. The cells that want to be right next to the macro’s pins for short wires are pushed back to the edge of the halo during legalisation, because the space they would ideally occupy is blocked. A handful of cells moving like that is enough to raise the maximum.
Congestion at the macro’s pin edge
After global routing, OpenROAD prints a congestion summary per layer. Trimmed:
[INFO GRT-0096] Final congestion report:
Layer         Resource        Demand        Usage (%)    Max H / Max V / Total Overflow
---------------------------------------------------------------------------------------
met1             40512          6120           15.11%             0 /  0 /  0
met2             39880          9842           24.68%             0 /  3 /  3
met3             28640          4410           15.40%             0 /  0 /  0
met4             14320          1270            8.87%             0 /  0 /  0
---------------------------------------------------------------------------------------
Total           123352         21642           17.55%             0 /  3 /  3
Overall usage is low, 17.5%, yet met2 has overflow: a few routing cells where more wires want to pass than there are tracks. The congestion map in the OpenROAD GUI (the heat map view of the global routing) shows where, in Figure 1: a narrow band along the macro’s pin edge.
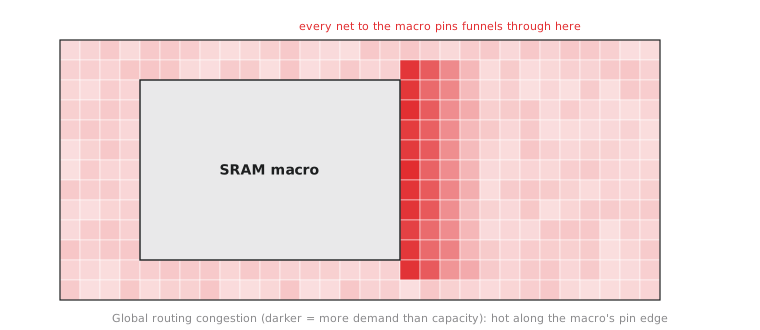
Every one of the 32 data inputs, 32 data outputs, 9 address bits and the control signals has to reach a pin on that one edge. The macro’s pins are a fixed set of exits, and every net touching the macro must funnel through the channel in front of them, however well the standard cells are placed. This is the channel effect Module 3 could only describe, now visible as a measured number. The congestion in Projects 1 and 2, what little there was, was spread out; here it is concentrated at one edge.
Routing
openlane --flow Classic --run-tag sram_run1 --from OpenROAD.GlobalRouting designs/sram_ctrl/config.json
The detailed router’s progress, trimmed:
[INFO DRT-0195] Start 0th optimization iteration.
    Completing 100% with 41 violations.
[INFO DRT-0195] Start 1st optimization iteration.
    Completing 100% with 3 violations.
[INFO DRT-0195] Start 2nd optimization iteration.
    Completing 100% with 0 violations.
[INFO DRT-0198] Complete detail routing.
Two things here differ from Projects 1 and 2. The first pass left far more violations, 41 against 7 on the ALU, and they sat in the same band global routing flagged, so the congestion map predicted where the router would struggle. And it took an extra optimisation pass to clear them. That is normal behaviour for a congested region, as Module 6 described, but it is the first time in this module we have seen the router work for it.
Pin access congestion at a macro edge is one of the most common reasons real teams ask for a macro to be regenerated with a different pin arrangement or aspect ratio, or move it in the floorplan, instead of fighting the router. The cheapest fix for a routing channel problem is often upstream of routing altogether.
Practice Exercise
Looking at Figure 1, propose one floorplan change, not a routing change, that would reduce the congestion along the pin edge, and explain how it works.
Solution
Give the channel more room. For example, move the macro further left, or increase the halo on the pin edge only, so that the band between the pins and the controller logic is wider. More width means more routing tracks crossing the band, so the same nets spread over more tracks and the overflow drops. Another option is to place the controller logic so that it wraps around the pin edge instead of sitting in one block beside it, which shortens the nets and spreads them over more of the edge.
Either way, it is a floorplan decision, and like the orientation check in the previous article’s exercise it is far cheaper to make before routing runs than to ask the router to squeeze an inherently tight channel through more passes.
Placement and routing finished, but only after visibly more work than in the first two projects: congestion where the macro’s pins forced it, and an extra routing pass to clear it. In the next article we verify the design, with particular attention to the boundary between the macro and the logic around it.